Top 8 Essentials to Inspect Before Purchasing Pre-Owned Windows Laptops

Top 8 Essentials to Inspect Before Purchasing Pre-Owned Windows Laptops
Quick Links
- Test the Keyboard and Trackpad
- Test the Speakers and Built-In Microphone
- Test the Built-In Camera
- Check the Health of Your Laptop Battery
- Ensure the Laptop Isn’t Stolen
- Perform the Physical Inspection
- Test the Wired and Wireless Connectivity
- Check the Health of RAM and Storage Drive
Buying a used laptop can indeed save you money, but it does come with some risks. This is why you should thoroughly examine the laptop before closing the deal to avoid unpleasant surprises later on. If you doubt the credibility of the seller, here’s how you can test the used laptop.
Test the Keyboard and Trackpad
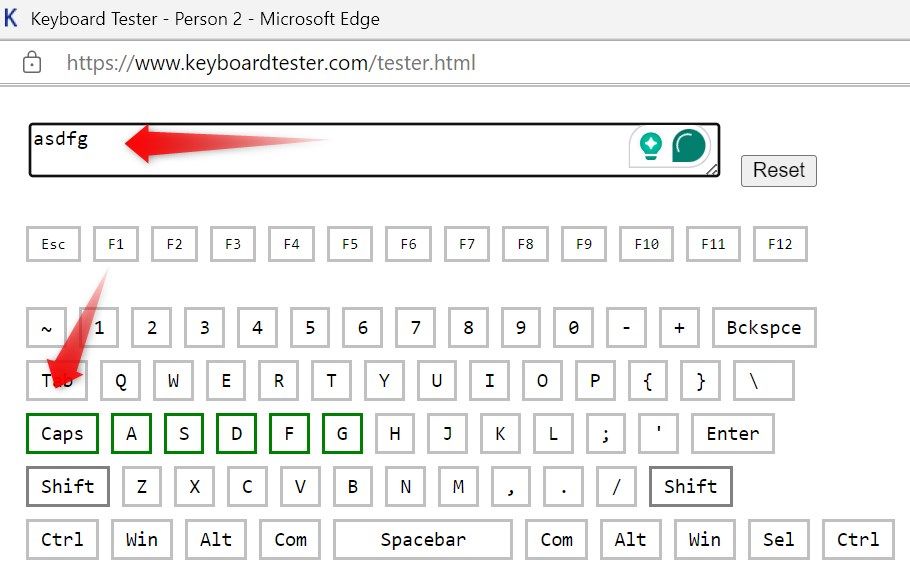
Begin the laptop inspection by testing the keyboard and trackpad first. To test the keyboard, go to a keyboard testing website like Keyboard Tester and press each key from the first to the last. If all keys register correctly, the keyboard is likely in good condition. Also, make sure you feel comfortable typing on the keyboard.

To test the trackpad, hover over the screen to gauge its responsiveness. Then, experiment with different trackpad gestures, such as pinch-to-zoom and two-finger scroll, to see which ones are supported. If you have another laptop, you can compare trackpad responsiveness by conducting a touchpad accuracy test on both laptops using the No-Cursor website .
This will help you confirm whether the trackpad on your new laptop is equally or more responsive than the other one.
Test the Speakers and Built-In Microphone
Next, you should test the built-in microphone and speaker. While you can simply play and record something to check if the audio input and output devices are working fine, Windows also offers a way to test them in Settings. On Windows 11, right-click on the Start button and select “Settings.” Then, navigate to System > Sound.
To test the built-in speakers, click on “Speakers” under Output, which will open the sound settings. Here, click on the “Test” button next to Format. If you hear clear sound coming out of your laptop speaker without distortion or muffling, it’s working properly. If the audio output is unclear, there may be an issue.

To test the built-in microphone , return to the sound settings, click on “Microphone Array,” and then click on the “Start Test” button next to Test Your Microphone. Speak for a few seconds, then stop the test. If you see a decent volume percentage recorded, the microphone is working as it should.

Test the Built-In Camera
If you intend to use the laptop for video communication, test its built-in camera. To do this, type Camera in the Windows Search bar and open the Camera app.
If the camera app detects the webcam and the visuals are clear and of satisfactory quality, as the seller claimed, then the camera is working correctly.
Check the Health of Your Laptop Battery
The more a laptop is used, the more its battery capacity diminishes. When purchasing a new laptop, you should ensure that it’s not heavily worn out. You can check this by generating a battery health report on Windows. Open the Windows PowerShell utility as an administrator , enter the following command, and press Enter:
`Powercfg /batteryreport`
This command automatically generates the report and saves it at C:\Users[YOUR USERNAME]\battery-report.html.

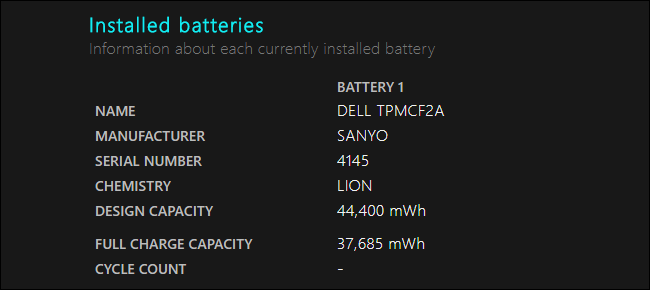
Navigate to this location and open the battery report. Then, go to the “Installed Batteries” section and compare the “Design Capacity” with the “Full Charge Capacity.” The difference between these values indicates the extent to which the battery’s capacity has diminished due to usage. If the full charge capacity is significantly low, you may have to replace the battery.

Ensure the Laptop Isn’t Stolen
If you’re thinking about buying a used laptop from an unknown seller, make sure that it hasn’t been stolen. One way to check this is to request a purchase receipt from the seller. If they are unable to provide one, this could be a red flag. If the laptop hasn’t been reset, is password-protected, or is locked, these signs indicate that it’s likely a stolen device.
You can also confirm your suspicions by getting the laptop’s serial number and contacting the manufacturer to verify whether the device has been reported stolen.
Perform the Physical Inspection
The appearance of the laptop body is a direct reflection of how carefully the original owner has treated the device. Any signs of scratches, cracks, dents, or loose and damaged hinges indicate rough handling by the previous owner. Missing screws are another indicator that the laptop may have been opened for repair or replacement, which raises a red flag.
Also, watch out for stickers that may be covering up wear and tear underneath, as this is a common practice.
Test the Wired and Wireless Connectivity
The worst scenario you could face is finding your laptop unable to connect to the internet (via Wi-Fi or Ethernet cable), USB ports failing to detect external devices, or Bluetooth malfunctioning—all after completing the purchase. Because of that, confirming there are no wired or wireless connectivity issues is important.
Start by connecting your laptop to Wi-Fi. Then, test its Ethernet port by plugging it directly into the router. If the internet connection works well, test the audio jacks with headphones. Similarly, check the USB ports by connecting a wired device. Finally, make sure Bluetooth is working by pairing a Bluetooth-powered device.
Check the Health of RAM and Storage Drive
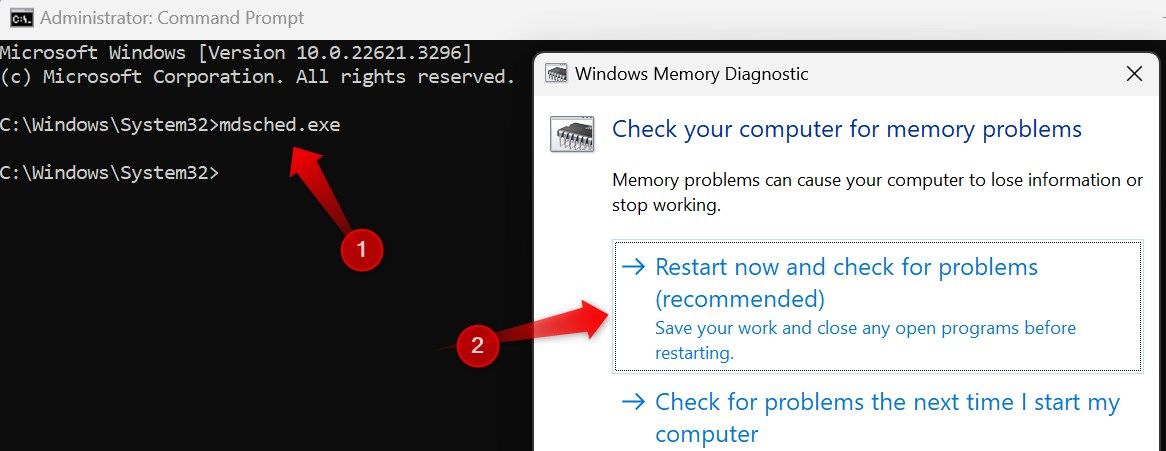
Finally, check the health of the RAM and storage drive to ensure they’re not faulty. To test the RAM, you can use the Windows Memory Diagnostic tool, which detects and displays potential issues with it. To run the test, open Command Prompt as an administrator, type mdsched.exe, and press Enter. Then, click “Restart Now and Check for Problems.”

Windows will restart and run the test. Once it finishes testing the RAM, it’ll restart again and display the test results. If you don’t see them, you can use the Windows Event Viewer to search for potential issues identified during the test. Open Event Viewer and go to Windows Logs > System. Click “Find,” type MemoryDiagnostic, and click “Find Next.”
Check the laptop’s storage drive to see if it is an SSD rather than an HDD. SSDs are preferable due to their speed and quiet operation. You should treat any laptop with a hard drive somewhat skeptically. Hard drives haven’t been the norm in many years, and finding one indicates that the laptop is likely quite old. Whichever you find, check the drive’s health to ensure it isn’t dying.
Buying a used laptop is affordable but risky. Following the tips above will help you spot potential issues with the device and minimize the risks of buying a faulty second-hand laptop. If you can only test the laptop after buying online, purchase from platforms like Amazon or BestBuy that offer refunds for faulty or falsely advertised items.
Also read:
- [New] Best Software Practices for Transforming Pictures Into Films
- [New] Elevate Your YT Marketing Essential Tips for Higher Rankings
- [New] Strategies to Extend GoPro Battery Hours
- [New] Unveiling FFXP An In-Depth Guide
- [Updated] 2024 Approved Crafting with Colors Principles in Action
- [Updated] In 2024, Indoor Android Games You Can Play Without a Network
- [Updated] Understanding IGTV Shutdown
- 2024 Approved Subdued Soundscape Stitches for Garageband Workflows
- 2024 Approved Top 10 Commercial Data Custodians
- 2024 Approved Unleashing Visual Velocity Illustrator's Guide to Motion Blurs
- In 2024, Easy Guide to Oppo Reno 8T 5G FRP Bypass With Best Methods
- In 2024, Ultimate Techniques for Creating Full-Sphere Photos
- Overcooked! 2 Game Breakdown: Savoring the Madness and Mastery of Multiplayer Cook-Off Chaos
- Shades of Success Color Grading Fundamentals
- The Definitive Guide to Classic Anime Themes for 2024
- Title: Top 8 Essentials to Inspect Before Purchasing Pre-Owned Windows Laptops
- Author: Mark
- Created at : 2024-12-19 22:10:52
- Updated at : 2024-12-24 19:09:04
- Link: https://some-guidance.techidaily.com/top-8-essentials-to-inspect-before-purchasing-pre-owned-windows-laptops/
- License: This work is licensed under CC BY-NC-SA 4.0.