
The Essential Guide to LUT Applications in Photoshop CS6 for 2024
The Essential Guide to LUT Applications in Photoshop CS6
Create High-Quality Video - Wondershare Filmora
An easy and powerful YouTube video editor
Numerous video and audio effects to choose from
Detailed tutorials provided by the official channel
With over two billion people posting videos and photos online, it is challenging to make your content stand out. However, some creators seem to always excel with their top-in-class creations. So, how do they do it?
Their success results from the effective use of editing programs and other enhancements to ensure their work is above the rest. For example, Adobe Photoshop CC allows you to effectively apply LUTs to your creations. Below is a complete guide on how to use luts photoshop to get you in the elite leagues.
In this article
01 How to Use LUTs in Photoshop
02 Free LUTs to enhance your image in Photoshop CC.
03 Looking for LUTs for Video? Try Filmora.
 Jet Profiler for MySQL, Enterprise Version: Jet Profiler for MySQL is real-time query performance and diagnostics tool for the MySQL database server. Its detailed query information, graphical interface and ease of use makes this a great tool for finding performance bottlenecks in your MySQL databases.
 How to Use LUTs in Photoshop
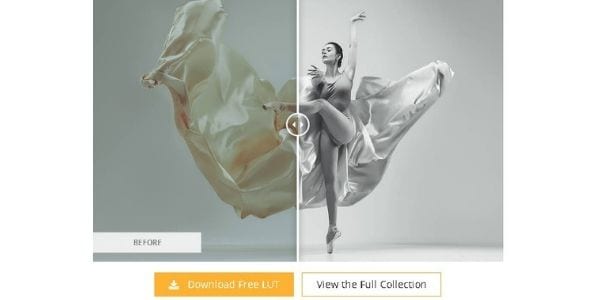
A Look Up Table (LUT) refers to a preset value of color calibrations you use in post-production. Some of the reasons for using LUTs include:
- Shorten your color grading time.
- Provide a base to develop your unique style.
- Quickly add color effects to your fast-turnaround videos.
You can use Adobe Photoshop CC to apply LUTs to your creation with ease. Additionally, it comes with preset LUTs to help you achieve a variety of color outcomes. For example, there are plenty of LUTs to give your image an artistic look, as if it was a painting. Additionally, you can use the program on both Windows and Mac devices, including handheld macOS devices.
With the basics out of the way, here is how to use LUTs in Photoshop:
1. Load your image to the workspace
You can load your photos directly from the program or launch them from your device. The most recent versions of the program store your media on the cloud.
2. Open the Color Lookup tool
The Color Lookup tool allows you to apply preset and custom LUTs to your image. Below is how to access it.
- Proceed to the Adjustments Panel and click Color Lookup from the dropdown menu. You will find this as the next option after Libraries, on the right side of your workspace. Most editions of Adobe Photoshop CC use a grid icon to represent Color Lookup.
- Alternatively, you may access Color Lookup from the Layers panel. Navigate to the bottom-right corner of your workspace and click the half-shaded icon. Then, select the Color Lookup option from the menu.
3. Loading your LUT in Photoshop CC
Once the Color Lookup tool is active, select the option Load 3D LUT to activate the dropdown menu. All your LUT presets will appear on the list, each with a different effect. You can also use custom LUTs in Photoshop CC. Here is how you access them.
- Click the Load 3D LUT entry from the dropdown menu. The program will open the File Explorer window that allows you to navigate directories on your device.
- Navigate to the directory that contains your custom luts photoshop, and select the one you need.
- Finally, click on Ok on the File Explorer window to complete the process.
- Make adjustments to your LUT in Photoshop CC.
Preset and custom LUTs may not give you the finish you anticipate. As such, you may need to make adjustments. Some of the adjustments you can make include:
- Color blending.
- Luminosity.
- Opacity.
- Saturation.
- Hues.
On the right side of your workspace is the Layers panel. It includes all the tools you need to edit your LUT. Remember, you need an Adjustment Layer to make changes to your LUTs. Additionally, you can save and export your custom LUTs for use across other video editing programs like Filmora.

Free LUTs to enhance your image in Photoshop CC
You now have an understanding of how to use LUTs Photoshop to enhance your photos and films. However, the presets LUTs that come pre-installed are often basic and leave a lot to desire. So, what do you do to make your creations better?
Most creators resort to increasing their LUT library from external sources. You can also increase your collection by adding free LUTs from these sources. Furthermore, you will get a sample of what to expect from each LUT collection.
1. Fix the Photo
Fix the Photo is an online professional photo editing company that has been operating since 2003. Despite offering a range of premium services, they also offer freebies for you to use in your DIY projects. Additionally, they give you samples of what you can achieve with each free LUT pack to help you in deciding what works best.
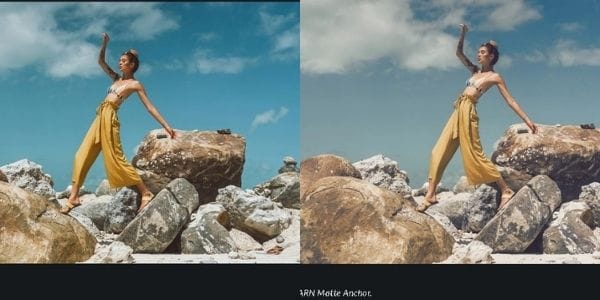
You can download this free Classical Monochrome LUT pack to give your photos a soft and gentle finish. The LUT pack is ideal for wedding photos, fashion, and lifestyle photos.
2. PH Learn
PH Learn is an online learning resource for aspiring photographers and filmmakers. It offers tutorials for the Adobe Creative Cloud Suite, along with free samples you can use to practice.
Here is a free LUT photoshop pack for you to use. It features a variety of creative LUTs ideal for portraits and nature photography.
3. Free Presets
Free Presets is another valuable LUT photoshop resource you must check out. It offers a variety of LUTs compatible with all your favorite editing programs including Photoshop CC. You can start with this color grading LUT collection to practice.


4. Envato Elements
The site is full of LUTs you can use across a variety of creative programs. However, you need to pay a subscription to get full access. Regardless, you may find one of their time-limited freebies if you keep checking.
 The BootIt Collection covers multi-booting, partitioning, and disk imaging on traditional PC’s using the standard BIOS and newer PC’s using UEFI. The collection includes BootIt Bare Metal (BIBM) for standard BIOS systems and BootIt UEFI (BIU) for UEFI system.
5. Giggster.com
Giggster.com is an online resource for aspiring filmmakers and photographers. You can find helpful guides and video tutorials on applying different finishes to your work, including color grading and effects.
 TubeDigger - online video downloader from mostly any site

Here is a free LUT photoshop pack you can use for your color grading projects. As you can see, the pack contains LUTs to transform your images into grayscale, adding a vintage yet crisp finish.
Looking for LUTs for Video? Try Filmora
Filmora is an easy-to-use video editing program available for both macOS and Windows. It offers you an interactive interface with preset LUTs you can apply to achieve exceptional finishes for each project. Some of the adjustments you can perform with the program include color grading, monitor calibration, and color transfer across different software.
Here is how to use LUTs in Filmora.
1. Download Filmora
Check the Filmora website to download your compatible version. Then, proceed with the installation to start using the video editing program.
2. Upload your video
Select the video you want to edit and drop it on the FIlmora timeline. Ensure you click the video so that it is active for editing.
3. Apply your LUT
Select Tools from the top menu in your workspace. Then, click on Color Correction from the dropdown menu. This opens the LUT importer, where you will click on Load new LUT to choose from a variety of presets and custom LUTs from your device. Once you find the LUT you need, press OK to apply the LUT.
Here are a few things to consider before using LUTs on Filmora.
- You may need to color correct your video before applying any LUTs. For example, your white balance needs to be on point to achieve the best results.
- Videos vary in quality depending on the equipment you use. Therefore, you may not receive the same results from applying the same LUT.
- You will need a subscription to access all of Filmora’s editing tools.
For Win 7 or later (64-bit)
For macOS 10.12 or later
Conclusion
● Regardless of the editing software you use, LUTs are essential to give your creations the extra boost they need to stand out. The LUT photoshop guide above is sufficient to help you unleash your creativity. Additionally, the free LUT resources give you the freedom to express your artform across different software. So, what are you waiting for? Put what you have read into practice and watch people craving more of your work. /p
With over two billion people posting videos and photos online, it is challenging to make your content stand out. However, some creators seem to always excel with their top-in-class creations. So, how do they do it?
Their success results from the effective use of editing programs and other enhancements to ensure their work is above the rest. For example, Adobe Photoshop CC allows you to effectively apply LUTs to your creations. Below is a complete guide on how to use luts photoshop to get you in the elite leagues.
In this article
01 How to Use LUTs in Photoshop
02 Free LUTs to enhance your image in Photoshop CC.
03 Looking for LUTs for Video? Try Filmora.

How to Use LUTs in Photoshop
A Look Up Table (LUT) refers to a preset value of color calibrations you use in post-production. Some of the reasons for using LUTs include:
- Shorten your color grading time.
- Provide a base to develop your unique style.
- Quickly add color effects to your fast-turnaround videos.
You can use Adobe Photoshop CC to apply LUTs to your creation with ease. Additionally, it comes with preset LUTs to help you achieve a variety of color outcomes. For example, there are plenty of LUTs to give your image an artistic look, as if it was a painting. Additionally, you can use the program on both Windows and Mac devices, including handheld macOS devices.
With the basics out of the way, here is how to use LUTs in Photoshop:
1. Load your image to the workspace
You can load your photos directly from the program or launch them from your device. The most recent versions of the program store your media on the cloud.
2. Open the Color Lookup tool
The Color Lookup tool allows you to apply preset and custom LUTs to your image. Below is how to access it.
- Proceed to the Adjustments Panel and click Color Lookup from the dropdown menu. You will find this as the next option after Libraries, on the right side of your workspace. Most editions of Adobe Photoshop CC use a grid icon to represent Color Lookup.
- Alternatively, you may access Color Lookup from the Layers panel. Navigate to the bottom-right corner of your workspace and click the half-shaded icon. Then, select the Color Lookup option from the menu.
3. Loading your LUT in Photoshop CC
Once the Color Lookup tool is active, select the option Load 3D LUT to activate the dropdown menu. All your LUT presets will appear on the list, each with a different effect. You can also use custom LUTs in Photoshop CC. Here is how you access them.
- Click the Load 3D LUT entry from the dropdown menu. The program will open the File Explorer window that allows you to navigate directories on your device.
- Navigate to the directory that contains your custom luts photoshop, and select the one you need.
- Finally, click on Ok on the File Explorer window to complete the process.
- Make adjustments to your LUT in Photoshop CC.
Preset and custom LUTs may not give you the finish you anticipate. As such, you may need to make adjustments. Some of the adjustments you can make include:
- Color blending.
- Luminosity.
- Opacity.
- Saturation.
- Hues.
On the right side of your workspace is the Layers panel. It includes all the tools you need to edit your LUT. Remember, you need an Adjustment Layer to make changes to your LUTs. Additionally, you can save and export your custom LUTs for use across other video editing programs like Filmora.
Free LUTs to enhance your image in Photoshop CC
You now have an understanding of how to use LUTs Photoshop to enhance your photos and films. However, the presets LUTs that come pre-installed are often basic and leave a lot to desire. So, what do you do to make your creations better?
Most creators resort to increasing their LUT library from external sources. You can also increase your collection by adding free LUTs from these sources. Furthermore, you will get a sample of what to expect from each LUT collection.
1. Fix the Photo
Fix the Photo is an online professional photo editing company that has been operating since 2003. Despite offering a range of premium services, they also offer freebies for you to use in your DIY projects. Additionally, they give you samples of what you can achieve with each free LUT pack to help you in deciding what works best.
You can download this free Classical Monochrome LUT pack to give your photos a soft and gentle finish. The LUT pack is ideal for wedding photos, fashion, and lifestyle photos.
2. PH Learn
PH Learn is an online learning resource for aspiring photographers and filmmakers. It offers tutorials for the Adobe Creative Cloud Suite, along with free samples you can use to practice.
Here is a free LUT photoshop pack for you to use. It features a variety of creative LUTs ideal for portraits and nature photography.
3. Free Presets
Free Presets is another valuable LUT photoshop resource you must check out. It offers a variety of LUTs compatible with all your favorite editing programs including Photoshop CC. You can start with this color grading LUT collection to practice.
4. Envato Elements
The site is full of LUTs you can use across a variety of creative programs. However, you need to pay a subscription to get full access. Regardless, you may find one of their time-limited freebies if you keep checking.
5. Giggster.com
Giggster.com is an online resource for aspiring filmmakers and photographers. You can find helpful guides and video tutorials on applying different finishes to your work, including color grading and effects.
Here is a free LUT photoshop pack you can use for your color grading projects. As you can see, the pack contains LUTs to transform your images into grayscale, adding a vintage yet crisp finish.

Looking for LUTs for Video? Try Filmora
Filmora is an easy-to-use video editing program available for both macOS and Windows. It offers you an interactive interface with preset LUTs you can apply to achieve exceptional finishes for each project. Some of the adjustments you can perform with the program include color grading, monitor calibration, and color transfer across different software.
Here is how to use LUTs in Filmora.
1. Download Filmora
Check the Filmora website to download your compatible version. Then, proceed with the installation to start using the video editing program.
2. Upload your video
Select the video you want to edit and drop it on the FIlmora timeline. Ensure you click the video so that it is active for editing.
3. Apply your LUT
Select Tools from the top menu in your workspace. Then, click on Color Correction from the dropdown menu. This opens the LUT importer, where you will click on Load new LUT to choose from a variety of presets and custom LUTs from your device. Once you find the LUT you need, press OK to apply the LUT.
Here are a few things to consider before using LUTs on Filmora.
- You may need to color correct your video before applying any LUTs. For example, your white balance needs to be on point to achieve the best results.
- Videos vary in quality depending on the equipment you use. Therefore, you may not receive the same results from applying the same LUT.
- You will need a subscription to access all of Filmora’s editing tools.
For Win 7 or later (64-bit)
For macOS 10.12 or later
Conclusion
● Regardless of the editing software you use, LUTs are essential to give your creations the extra boost they need to stand out. The LUT photoshop guide above is sufficient to help you unleash your creativity. Additionally, the free LUT resources give you the freedom to express your artform across different software. So, what are you waiting for? Put what you have read into practice and watch people craving more of your work. /p
- Title: The Essential Guide to LUT Applications in Photoshop CS6 for 2024
- Author: Mark
- Created at : 2024-08-21 22:01:31
- Updated at : 2024-08-22 22:01:31
- Link: https://some-guidance.techidaily.com/the-essential-guide-to-lut-applications-in-photoshop-cs6-for-2024/
- License: This work is licensed under CC BY-NC-SA 4.0.