Secure Your iOS Device: A Must-Know Guide for Losing or Theft Scenarios

Secure Your iOS Device: A Must-Know Guide for Losing or Theft Scenarios
Key Takeaways
- Thieves can disable Find My iPhone tracking by enabling Airplane Mode from Control Center whether your iPhone is locked or not.
- To beat it, create a “Theft Protection” shortcut that locks the screen and disables Airplane Mode again, then set up a Shortcuts automation to immediately run it whenever Airplane Mode is turned on.
Your iPhone has a lot of built-in protections in case it gets stolen. But a cunning thief might snatch it out of your hand after you unlocked it and stop you tracking it by enabling Airplane Mode. I created this shortcut to protect myself in case either of those things happen.
What iPhone Thieves Do When They Snatch an iPhone

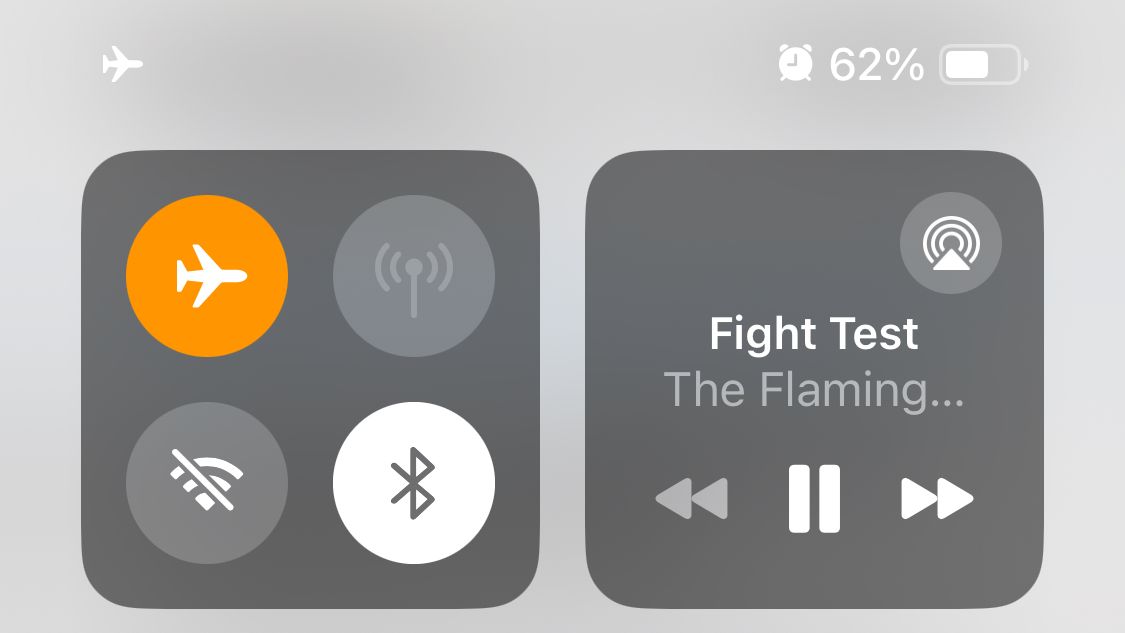
Most of us have Find My enabled so we can easily track our iPhone if it ever goes missing or gets stolen. However, it’s very easy for a thief to stop location tracking by enabling Airplane Mode from the Control Center.
By default, an iPhone lets you access the Control Center when it’s locked, so a thief wouldn’t even need your passcode to do this.
If you haven’t already, you can change this behavior for better security by going to Settings > Face ID/Touch ID & Passcode, then scrolling down to the “Allow Access When Locked” section and disabling “Control Center.”
Close
But that’s not enough. What if someone snatched your iPhone right after you unlocked it? Not only could they open Control Center to turn on Airplane Mode and stop you tracking anything, but they would also have access to all your data. This is exactly why Apple added Stolen Device Protection to devices , which you should also turn on.
But the shortcut below will give you even more protection.
How an iPhone Shortcut Can Help
The idea behind this shortcut is pretty simple. The first thing most thieves will do after stealing an iPhone is enable Airplane Mode to stop location tracking, so we can make that an automation trigger to run a custom “Theft Protection” shortcut. You could use this shortcut to run all kinds of actions, but I suggest disabling Airplane Mode and locking the screen.
That would mean as soon as a thief enabled Airplane Mode, it would automatically turn off again (so you can keep tracking the phone) and it would lock the device (so they can’t try again or access yoru data without knowing your passcode). You can even make this shortcut take a photo with the selfie camera to get a photo of the thief, though that does slow it down a bit.
If you haven’t used the Shortcuts app before, here are some other cool shortcuts you might want to try out .
A Guide to Creating This Shortcut
This shortcut is pretty easy to create, but I’m going to split it into two sections to make it as clear as possible. The first section is about creating the “Theft Protection” shortcut that runs when Airplane Mode is enabled, letting you choose exactly what you want to happen. The second section shows you how to set up the automation to trigger that shortcut when Airplane Mode is turned on.
Both steps of these instructions are crucial, so don’t skip one.
Step 1: Create a “Theft Protection” Shortcut
Open the Shortcuts app on your iPhone and tap the “+” to create a new shortcut. Open the dropdown at the top of the screen to rename the shortcut. You can call it whatever you like, but I call mine “Theft Protection.”
Close
Now tap “Add Action.” Search for and add the “Lock Screen” action. Then search at the bottom of the screen to add the “Set Airplane Mode” action. Make sure you configure it to turn Airplane Mode “Off.”
I’d also recommend adding actions to make sure Wi-Fi, Bluetooth, and Cellular Data are all turned on as well, just to make sure they haven’t been disabled separately.
Close
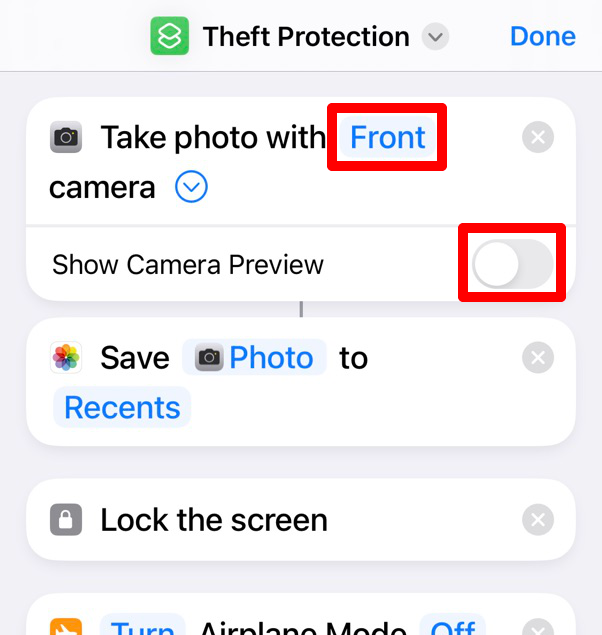
If you want to take a photo of the thief, you need to add the “Take Photo” action set to use the “Front” camera. Also, open the dropdown and disable the “Show Camera Preview” option. Then pair it with the “Save to Photo Album” action immediately below, otherwise the photo won’t save. You’ll need to move both of these actions to the top of the list so it can take a photo before the screen locks.

Taking a photo slows the shortcut down, so it could be more secure to go without it.
Step 2: Create an Automation Trigger for Your Shortcut
Now that you’ve created your shortcut, you need to make it run automatically whenever Airplane Mode is enabled. In the Shortcuts app, go to the “Automation” tab and tap the “+” or tap “Create New Automation.” Search for and select “Airplane Mode.”
Close
Make sure the automation triggers when Airplane Mode “Is Turned On” and be sure to set it to “Run Immediately,” otherwise it’ll ask the thief for confirmation before running, which isn’t very helpful for us. Then tap “Next” and select the “Theft Protection” shortcut you created in the previous step.
Close
When you’re done, be sure to test the shortcut by turning on Airplane Mode. You should find that the screen locks and Airplane Mode turns off again a moment later. If it doesn’t work, try restarting your iPhone first.
How and When to Disable the Shortcut
Of course, there will be times when you actually do want to use Airplane Mode. For those situations, you’ll need to disable this automation. Just go to Shortcuts > Automation and select your “Airplane Mode” automation. Then open the “Automation” dropdown and select “Don’t Run.” After you tap “Done,” the automation will be disabled until you change that setting back to “Run Immediately.”
Close
Make sure you never set it to “Run After Confirmation,” as a thief can then easily stop it running if you do that.
Since I don’t live in a high-crime area, I keep this shortcut disabled most of the time. But I make sure to enable it whenever I’m traveling with my iPhone or going to a busier area.
Also read:
- [New] In 2024, Enhancing Imagery A Step-by-Step Guide to Crop Videos on Instagram
- [New] In 2024, Explore the World of Tiny Screens Top 6 Online Tools for Free & Complimentary YouTube Short Downloads
- 2024 Approved Uniting Images Into an Eye-Catching Narrative Display
- 2024 Approved Unlock New Speech Potentials on Chrome Ranked Top Voice Alteration Tools
- Amazfit Helio Ring Unveiled: Key Features, Cost Details & Launch Timeline
- In 2024, The Best Budget Video Players Across Operating Systems
- In 2024, Ultimate Innovation in Desktop Computers
- Inside ACID Pro Benchmarking Alternatives for 2024
- Is Your Internet to Blame, or Is Nintendo's Service Actually Down?
- Seconds in a 20MB HD Video File
- Strategic Ignorance: Eliminating Superfluous ChatGPT Plugins
- The Art of the Daily Share Keep Your Digital Diary Top-Notch for 2024
- The Metaverse & MultipleMetaverse Explained Key Contrasts Highlighted for 2024
- Top 10 iPhone & Android Video Editing Apps for GoPro for 2024
- Unprecedented Capacity Choices Elite Cloud Services for 2024
- Updated The Best English Voice Generator To Convert Text Into Desired Accent for 2024
- Title: Secure Your iOS Device: A Must-Know Guide for Losing or Theft Scenarios
- Author: Mark
- Created at : 2024-12-23 19:43:59
- Updated at : 2024-12-24 17:57:16
- Link: https://some-guidance.techidaily.com/secure-your-ios-device-a-must-know-guide-for-losing-or-theft-scenarios/
- License: This work is licensed under CC BY-NC-SA 4.0.